
I recently organized the Christmas decorating for our son's fraternity house at college. All the freshman moms were invited to help, and I came up with an idea one day when I was going through my cedar closet. I had a pile of red and blue plaid fabric from our older son's high school graduation party. We had used the fabric for table cloths outside on the patio.
It was all the same school colors as the university, so I wondered how we could use it. The house mother at the fraternity had said they were a bit short on ornaments last year, and as it turned out, it was very easy to make fabric ornaments. A group of moms and I got to work to make them, and I wanted to share this easy DIY with you!

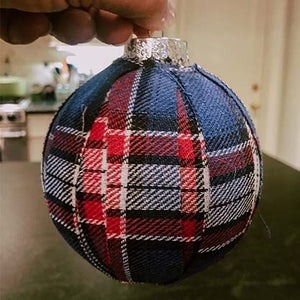
The supplies you need are fabric, a glue gun with glue, a clear plastic ornament (I like a 4" one on a tree), a loop rotary cutter, fabric scissors and an 18" x 24" gridded cutting mat.

Using the loop rotary cutter and the cutting mat, cut the fabric into 1" strips, long enough to go around the ornament. You will need 9 strips per 4" ornament.

 Put the hot glue on one end of each strip, placing it at the top of the ornament, next to the opening.

Put glue on the other end of each strip after wrapping them around the ornament. Just keep gluing down the ends of each strip until you have covered the ornament, usually 9 strips.

The ornaments looked really awesome on the tree at the fraternity house - all in the colors of the university. The moms and I all agreed the plaid was great for the college boys.
Comments will be approved before showing up.

Hi! I'm Merrie. I'm a lover of lake life and all the styles to go with it. Enjoy shopping through my store and being lakeside with me!


