
I have a soft spot in my heart when it comes to these hand-made angel tree ornaments. I remember when my grandmother, who lived to 100, gave me one of these that she had made and laughed at how much trouble it was to make. But they're really not! I made one in 30 minutes! When my aunt, her daughter, passed away several decades later, I found a collection of them at her house. Now they live on our Christmas tree at the lake.
These are great crafts for all ages - children and adults - as long as the younger ones can operate a hot glue gun. When you're done, you have a uniquely beautiful keepsake that you have created with your choice of fabric, trim and hair color!

These are the supplies you need: fabric of your choice for the dress, trim for the dress if you so choose, round-headed clothes pins (available on Amazon), doll hair (available on Amazon), 6 inches of lace or see-through fabric for the wings, tiny rose bud if you want to place head of angel, Sharpie marker for eyes, nose and mouth, hot glue gun, scissors, a lid to use as a guide for the dress pattern.


1. Cut the fabric in a circle using the lid as a guide. Cut a slit right in the middle to allow the head of the clothes pin to pop through.

2. Glue any trim onto the dress as desired.

3. Cut the doll hair to the desired length and glue on with hot glue gun.

4. Slip the clothes pin through the hole in the dress. Tie a belt on using trim if desired.

5. Tie the wings in the middle with trim and hot glue them onto the back of the angel.
6. Embellish the angel's head with a rose if desired.

7. Use Sharpie to draw eyes, nose and mouth onto clothespin head.

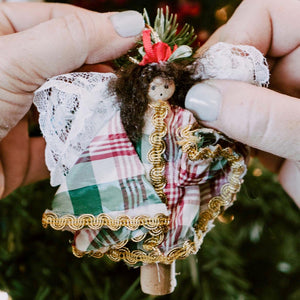
This is my finished angel ornament. Do you think I did as well as my grandmother?
Comments will be approved before showing up.

Hi! I'm Merrie. I'm a lover of lake life and all the styles to go with it. Enjoy shopping through my store and being lakeside with me!


